When developing the 3D Brain Viewer project, one of the key components was efficiently generating brain masks from medical images. In this article, I’ll walk through how I used CUDA (via Numba) to accelerate this task on the GPU, using Python.
Here are the primary packages used in the implementation:
1. OpenCV (cv2) — for loading and processing image files
2. NumPy — to manage data structures shared between CPU (host) and GPU (device)
3. Matplotlib (pyplot) — optional, for visualizing the mask results
4. OS — to manage file paths and output directories
5. Numba CUDA — to write and execute CUDA kernels directly in Python
The Github Repository: Mask Map Generator (Simple)
Let’s start by loading a brain CT scan using OpenCV:
import cv2 as cv
import os

img = cv.imread(f"{os.getcwd()}/src/52.jpg")

if img is None:
    print("Image load failed")
    quit()
print("Successful!")
Even if the input image is already in grayscale, we’ll explicitly convert it to ensure consistency:
img_gray = cv.cvtColor(img, cv.COLOR_BGR2GRAY)
We’ll create a NumPy array with the same shape as the grayscale image to hold the output mask:
import numpy as np

results = np.zeros_like(img_gray)
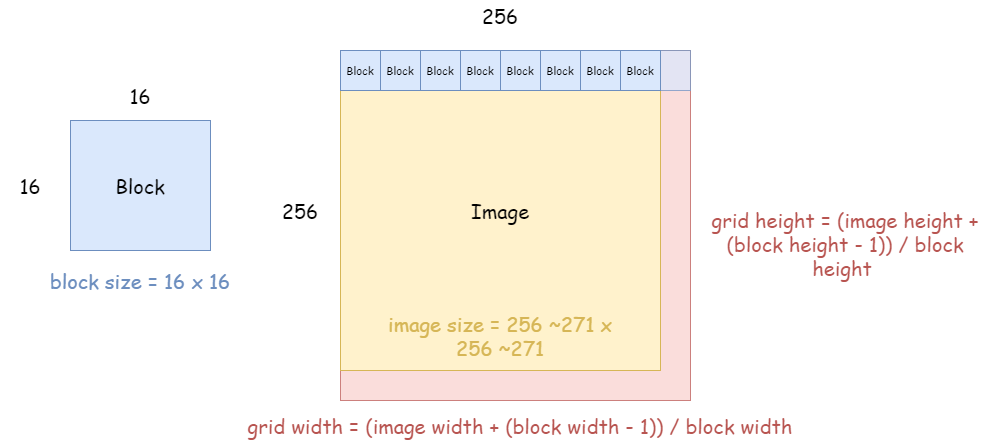
Let’s break down how we design the CUDA thread structure. Consider an image of size 256x256. In CUDA, the number of threads in a block is limited (typically up to 1024).
For 2D problems like image processing, it's common to use a block size of 16x16, giving 256 threads per block. However, the image size may not be a perfect multiple of the block size. So we calculate the grid size using ceiling division:
from numba import cuda

threadsperblock = (16, 16)
blockspergrid_x = (img_gray.shape[0] + threadsperblock[0] - 1) // threadsperblock[0]
blockspergrid_y = (img_gray.shape[1] + threadsperblock[1] - 1) // threadsperblock[1]
blockspergrid = (blockspergrid_x, blockspergrid_y)
Our goal is for each thread to handle one pixel. We'll use cuda.grid(2) to calculate thread indices safely and clearly:
@cuda.jit()
def mask_map(img, mask):
    x_idx, y_idx = cuda.grid(2)

    if x_idx < img.shape[0] and y_idx < img.shape[1]:
        if img[x_idx][y_idx] > 0:
            mask[x_idx][y_idx] = 1
        else:
            mask[x_idx][y_idx] = 0  # Always set explicitly
cuda.grid(2) is equivalent to manually calculating:
x_idx = cuda.threadIdx.x + cuda.blockIdx.x * cuda.blockDim.x # threadIdx.x gives the thread's index within the block (x axis), blockIdx.x gives the block's index within the grid (x axis), and blockDim.x gives the number of block in the grid (width).
y_idx = cuda.threadIdx.y + cuda.blockIdx.y * cuda.blockDim.y
Using cuda.grid() reduces the risk of mistakes in index calculation.
With everything prepared, we copy data to the GPU, execute the kernel, and retrieve the result:
d_img = cuda.to_device(img_gray)
d_results = cuda.device_array_like(results)

mask_map[blockspergrid, threadsperblock](d_img, d_results)
cuda.synchronize()

d_results.copy_to_host(results)
Finally, we visualize both the original image and the resulting binary mask:
import matplotlib.pyplot as plt

plt.subplot(1, 2, 1)
plt.imshow(img_gray, cmap='gray')
plt.axis('off')
plt.title("Original Image")

plt.subplot(1, 2, 2)
plt.imshow(results, cmap='gray')
plt.axis('off')
plt.title("Mask Map")

plt.show()
By offloading pixel-wise operations to the GPU using CUDA and Python’s Numba library, we significantly accelerate the generation of brain masks. This is particularly useful when dealing with large medical datasets or needing real-time interactivity in 3D applications. If you found this useful, feel free to explore more on GitHub or leave a comment below!
Last updated: